Your Cart is Empty
Enjoy FREE SHIPPINGTO CANADA AND CONTINENTAL U.S. FOR ALL ORDERS OVER $175 CDN. We ship from Canada
Enjoy FREE SHIPPINGTO CANADA AND CONTINENTAL U.S. FOR ALL ORDERS OVER $175 CDN. We ship from Canada


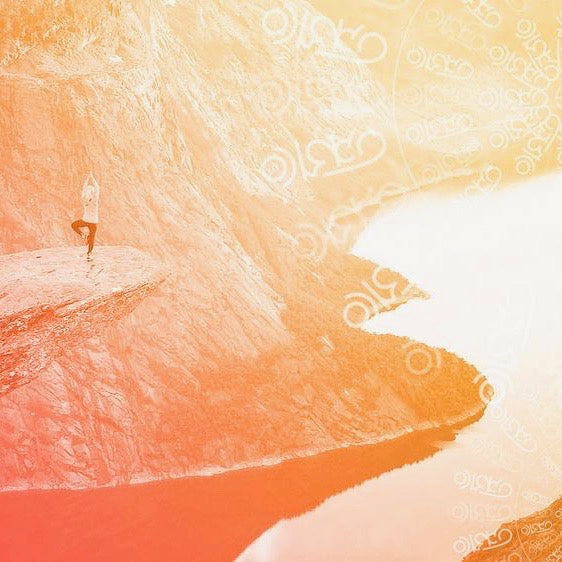
HUM MINDFULNESS YOGA
CREATED IN COLLABORATION WITH JENNIFER REABURN
The HUM HOME PRACTICE is Mindfulness Yoga: yoga and meditation grounded in mindfulness and forged into one powerful, transformational practice. Here at HUM, Mindfulness Yoga is...
A meditative, mindful approach to the practice of yoga, working to stay present in the moment, and not lost in the past or worrying about the future
An exploration of the body and the mind through the postures and their variations...
...using the breath as our anchor to the present moment, coming back to it whenever our attention wanders...
...bringing awareness to the breath, the body and the sensations we feel, any thoughts or emotions that may come up along the way, and just noticing, without judging.
We pay attention to how the postures feel, not how they look.
And we do so with kindness and compassion for ourselves while we are doing it.
We recognize the changing nature of the body and the breath, and know that what might feel good one day may not feel good another day - we just accept that and always do what feels right for our body.
Start your Mindfulness Yoga journey by getting familiar with these 7 ESSENTIAL YOGA POSES and lay a solid foundation for your home practice. These are the fundamental poses that show up in almost every yoga class you go to, every yoga video you watch online. You can practice all or any of them every day. Don't rush through here, take the time to explore each of these poses to understand the alignment of each pose and how your body feels in each one. You will build up confidence as you experiment with each one. Make friends with these essential poses as you will be seeing them often!
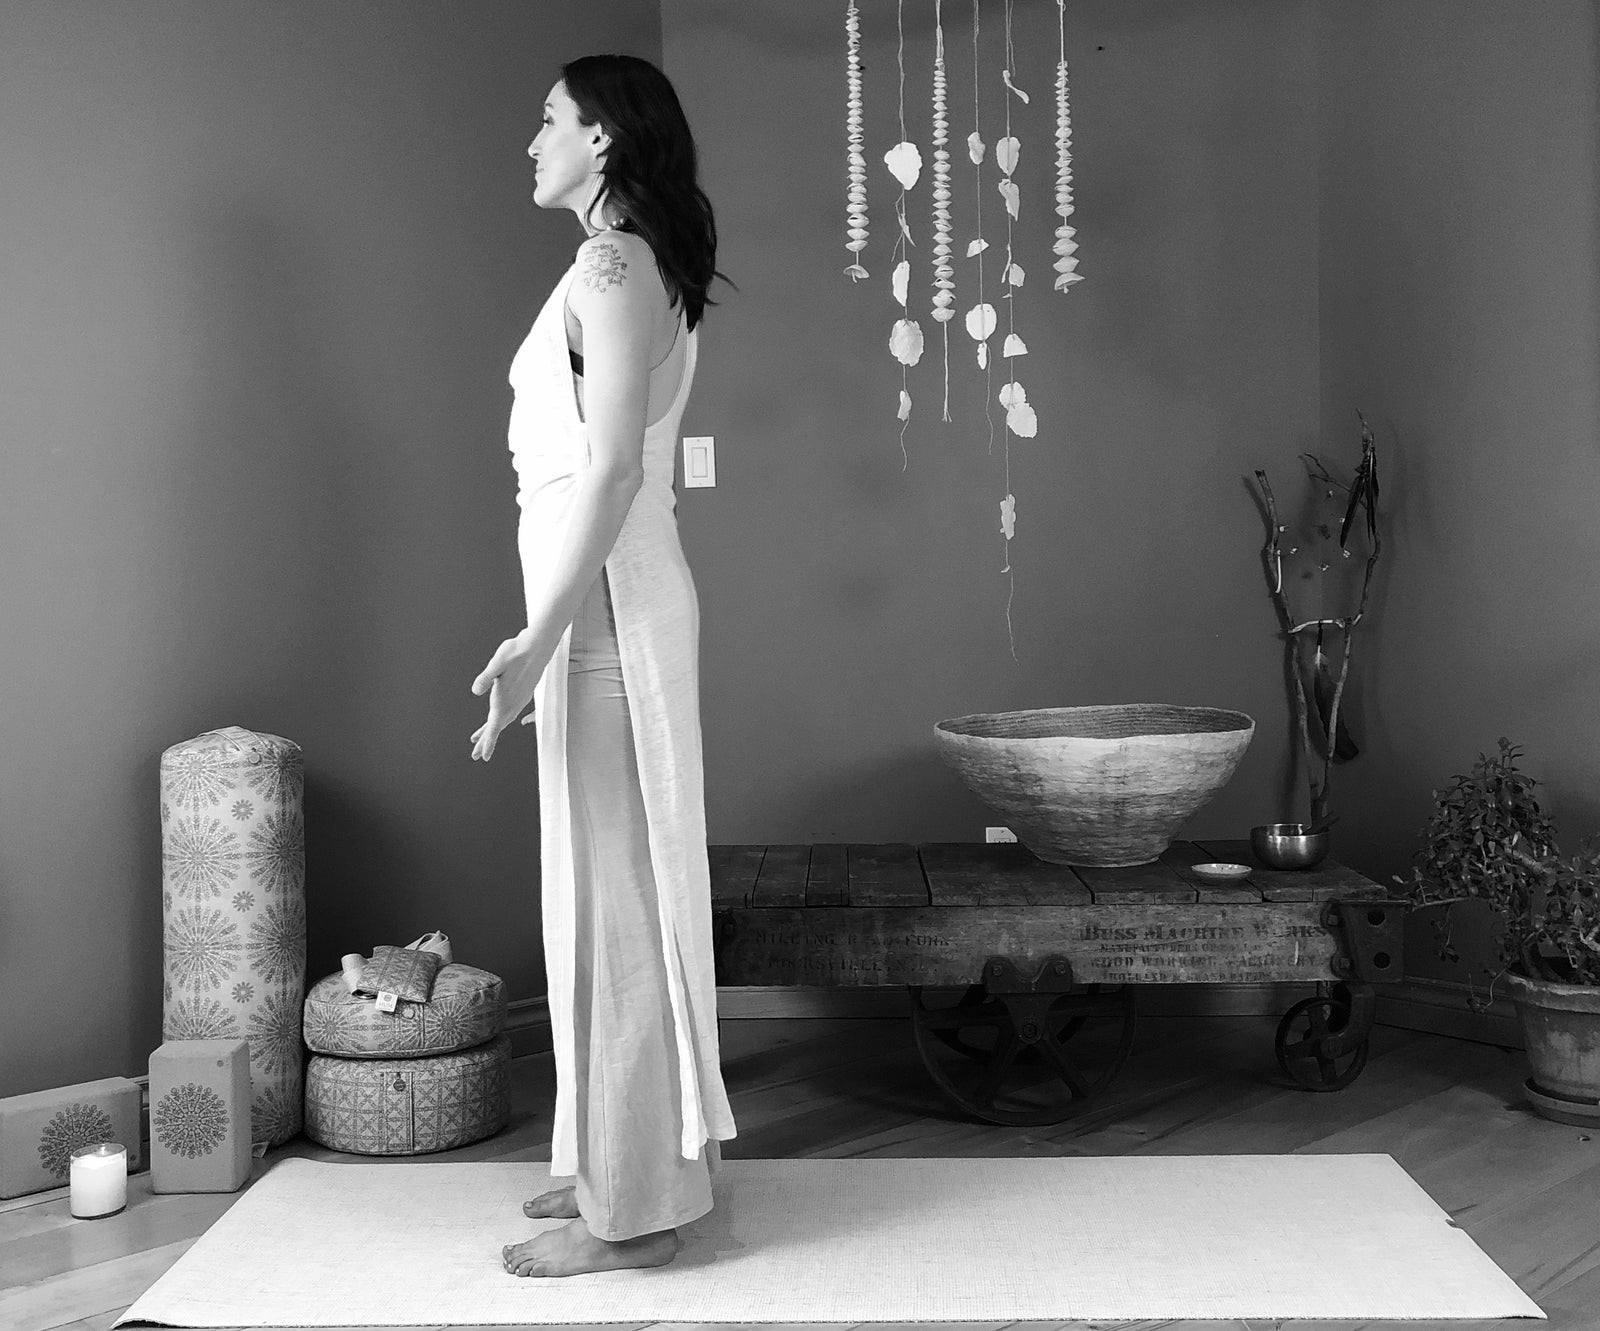

Mountain Pose is the foundation of all standing poses. It is often the first pose of a practice or used at intervals throughout a practice to rest and provide opportunity to notice the sensations in your body when transitioning from one pose to the next. Feel tall and strong and solid in this pose, like a mountain. It's a wonderful place to close your eyes and tune into the sensations in your body, noticing the differences from side to side. And it's great for your posture!
HOW TO DO MOUNTAIN POSE:
Stand with your feet about hip width apart and parallel.
Feel your feet rooting down into the earth - we sometimes say "plant all 4 corners of your feet firmly into the ground" - which means balance your weight between the base of your little toe, the base of you big toe, the inside of your heel and the outside of your heel.
Lift you knee caps to engage your thigh muscles.
Gently pull your abdominal muscles in towards your spine.
Shoulders are relaxed and dropped away from your ears. Feel as though they are moving away from each other, creating openness at your heart centre.
Arms are relaxed but active - your palms can be facing in or forwards.
The spine should be tall and straight, as though an invisible thread is attached to the crown of your head pulling gently skyward, creating a sensation of spaciousness in your spine.
Take a moment to experience and appreciate this lovely balance between the solid, weightiness of your legs and the light, spaciousness of your upper body. And the confidence you feel.
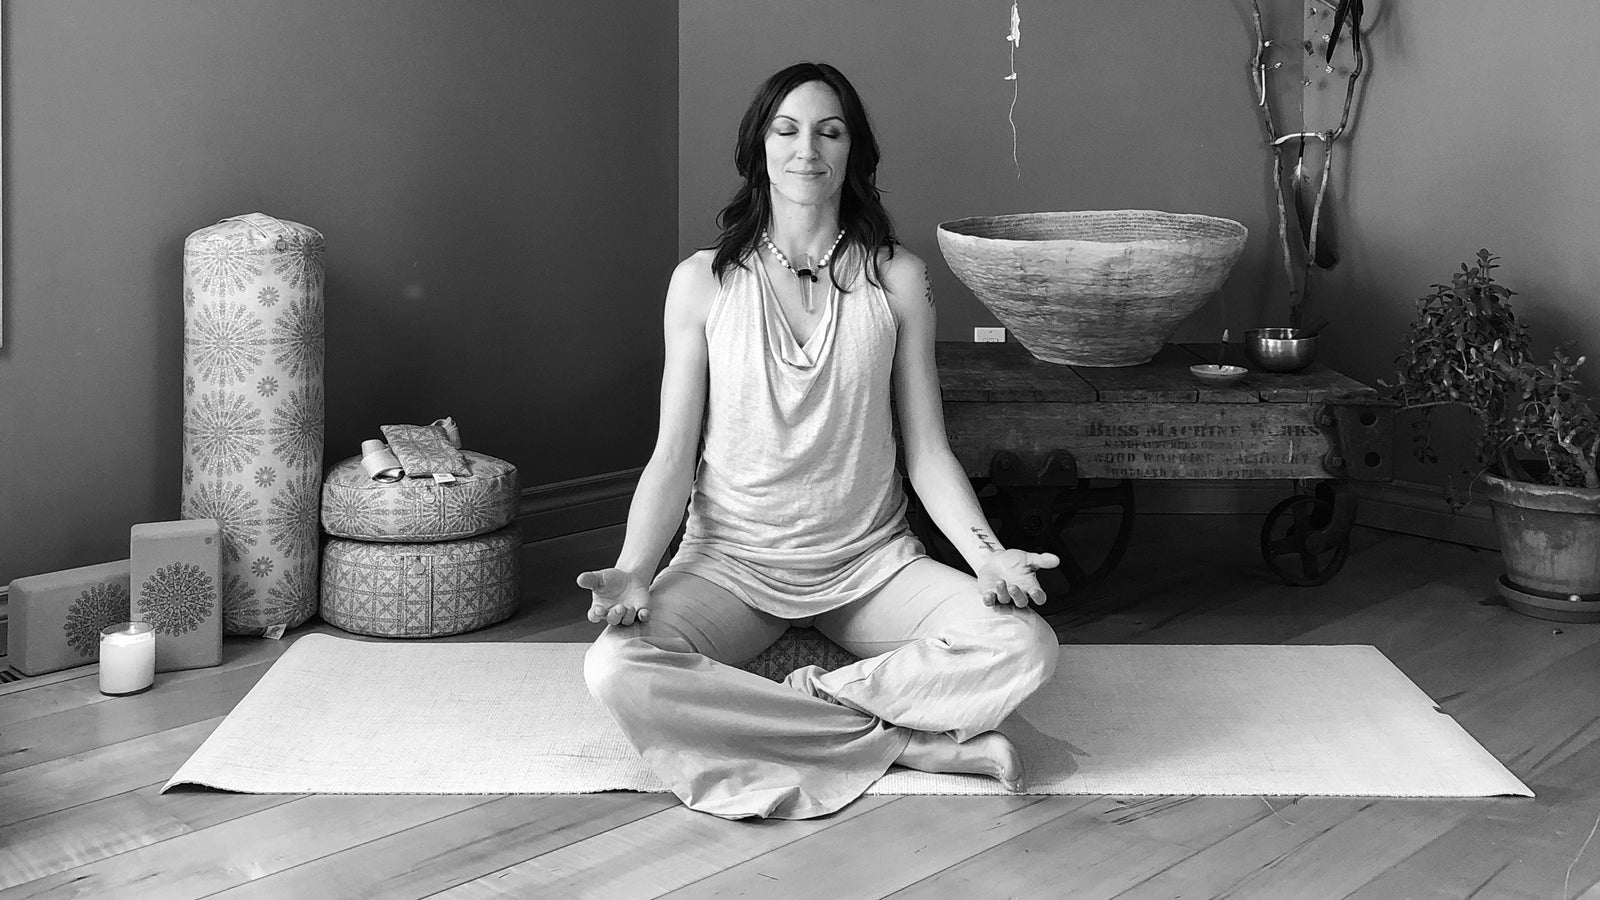

This sitting pose is a starting point for simple seated twists and seated side bends. If you are new to sitting on the floor, try sitting on a higher meditation cushion, a bolster with a blanket folded on top, or several folded blankets. Experiment to see what feels most comfortable. You may wish to prop your knees up with blocks, cushions or folded blankets.
HOW TO DO EASY POSE:
Start in a cross legged seated position with your hips propped up on a folded blanket, a bolster or a meditation cushion so that your pelvis and spine can be comfortably at neutral (front hip points and pubic bone in a straight line, lower ribs in line with hip points.)
Flex your feet, and slide them under the opposite knees.
Get settled and allow your sitz bones to receive the stillness of the floor, and your spine to lengthen upward.
You can place your hands on your knees, or together at heart centre.
When you first sat, which leg did you cross in front? Now try crossing the opposite leg in front, and notice the difference. In any seated pose, always try to cross one leg in front, and then the other, to create balance in your hips.
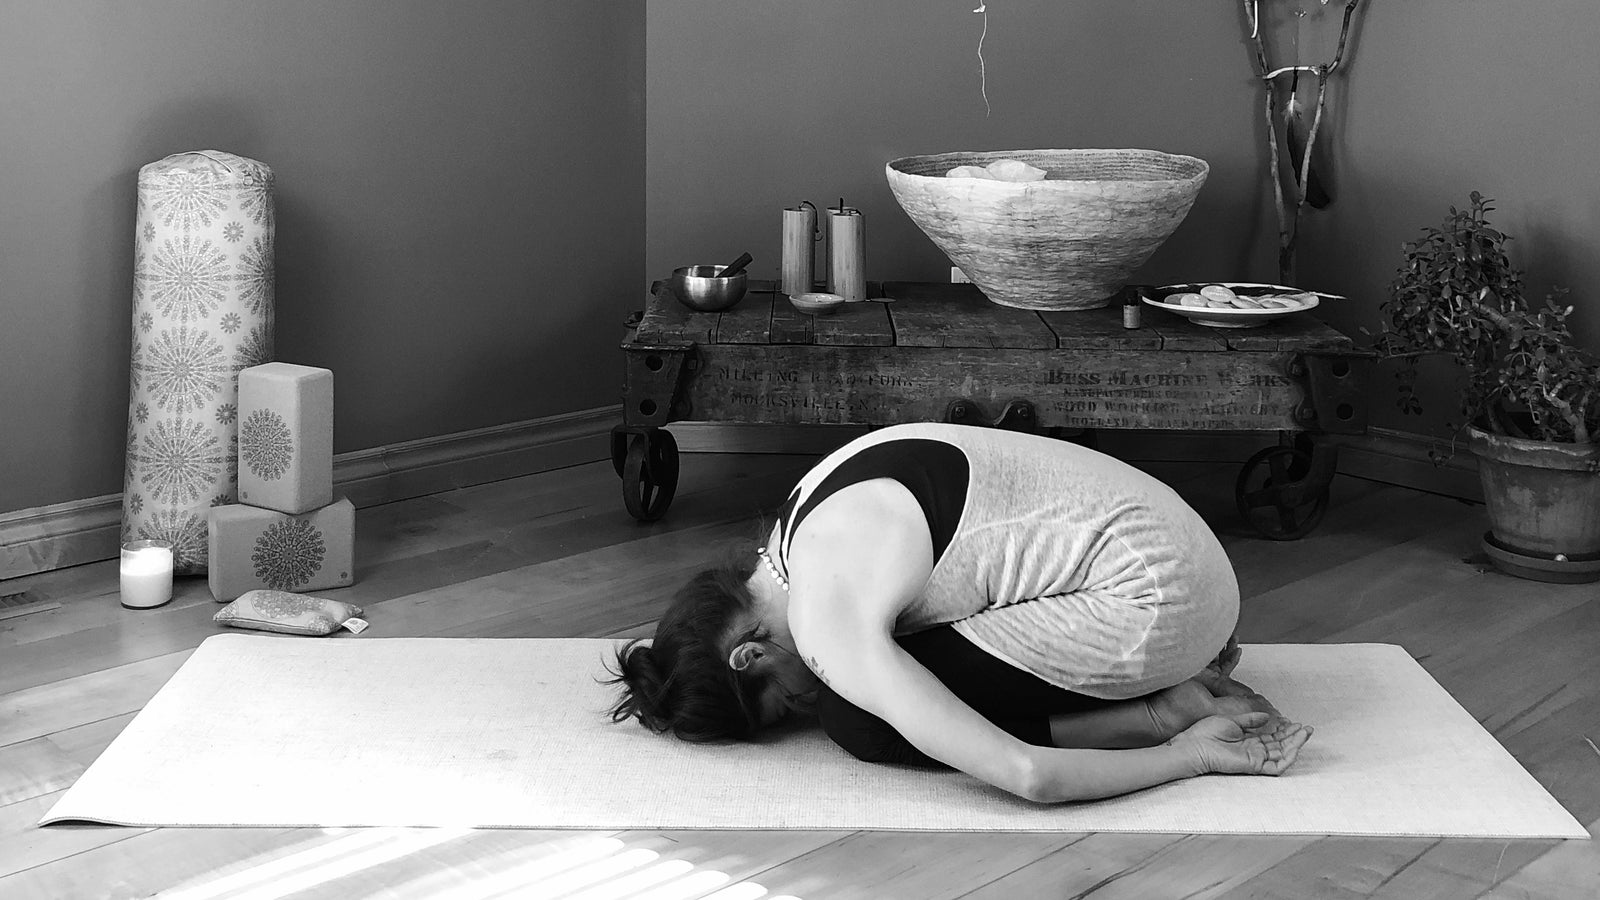

Childs Pose is a gentle rest pose that you can use at any time during your practice, a place to come back to whenever you need a rest. It brings you spine into a gentle C curve providing a gentle stretch to your lower back, hips, thighs, knees and ankles. It is also a very calming position, calming the nervous system and helping to release stress.
NOTE: This pose may not be good for you if you have a knee injury, and should be avoided if you have acute diarrhea. You can modify this pose for tight ankles with a blanket under your shins. Always listen to your body.
HOW TO DO CHILD'S POSE:
Start on all fours with your knees hip distance apart and the tops of your feet on the ground, big toes touching.
Bring your hips back to sit your heels.
Lower your forehead towards the floor, or to stacked fists or forearms; if your forehead is on the ground, you can reach your arms forward, or back by your heels.
Relax completely and receive the support of the floor into your body, notice the movement of your breath in your back, and focus on receiving and releasing with ease.


As you move your spine through its comfortable range of flexion (rounding forward) and extension (bending backward), synchronizing the movement with your breath, this dynamic pose increases flexibility and mobility in your spine, helps decrease tension and stress. Cat-Cow may help relieve lower back pain, sciatica, and menstrual cramps.
HOW TO DO CAT-COW POSE:
Set up on hands and knees, with your shoulders over your wrists and your hips over your knees.
Move slowly and with your breath
As you inhale, tip your tailbone to the sky, drop your navel, pull your collar bones forward and look up (this is Cow Pose)
As you exhale, curl your tailbone under, round your back to the sky, draw your navel to your spine, and drop your head towards your chest (this is Cat Pose)
Continue with as many rounds of these two alternating poses as you like, moving slowly and mindfully from one to the other.
Scan your awareness through your whole spine from your tailbone to the crown of your head on every breath, bringing awareness to every inch of your spine.
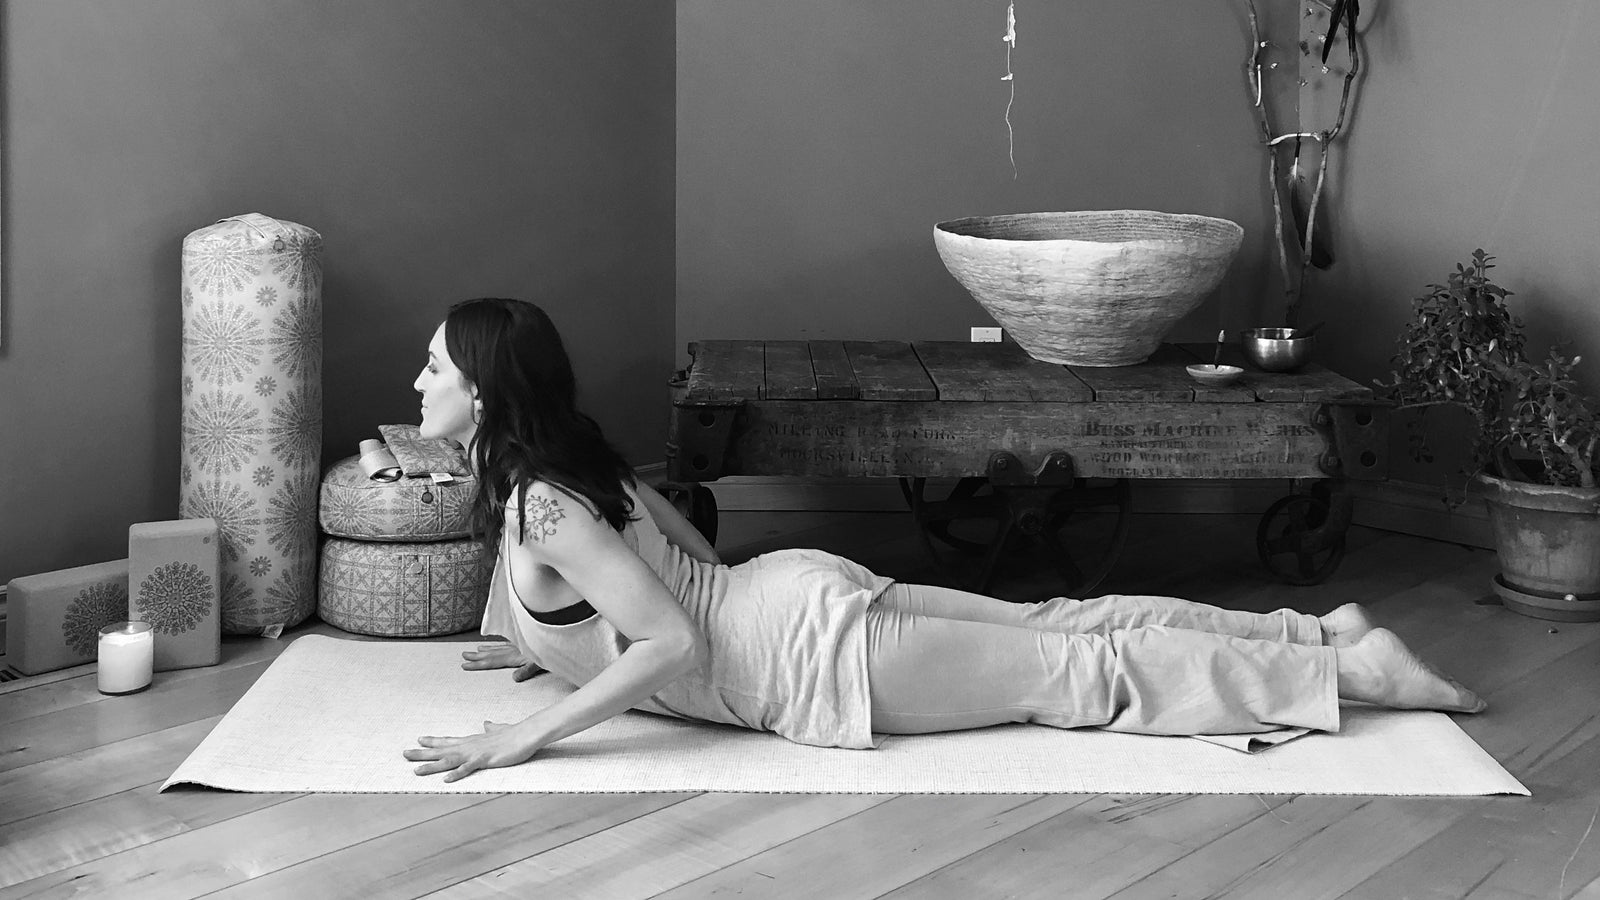

Cobra Pose is a gentle backbend that helps to open your heart. It also mobilizes the spine into extension and stretches the muscles across your chest. It may help improve or prevent lower back pain. Avoid pushing all your weight down into your hands and over bending in your lower back -- the energy is to move forward and up; continuing to press into your pubic bone into the floor helps keep the lower back protected. Emphasize the backbend in your middle and upper back. Always move within the range that is comfortable for your body.
While practicing cobra pose, see if you can find the balance between effort and ease. The effort is in the power of the legs and back to hold the pose. Notice where you feel the effort. And then, can you find ease in other places? For example, is your breathing fluid and relaxed? Is it possible to relax your jaw and the tops of your shoulders, and allow the work to be only where it needs to be? And don't forget to smile!
HOW TO DO COBRA POSE:
Lower onto your stomach. Engage the muscles of your legs and press them in towards each other like one long strong cobra tail. Press down through all ten toenails and down through your pubic bone.
Bend your elbows and place your hands on either side of your ribcage, pressing firmly into the mat and trying to pull your hands back towards your hips. Elbows are up and in towards your back.
Start to extend your spine forward and up, keeping the back of your neck long.
The energy is grounded through your legs and pubic bone, and rising through to the crown of your head. Reach your heart forward and breathe softly and fully down into all sides of your ribcage.
Your gaze is forward, like a cobra head. Don't add extra effort and tension to your neck by looking upward.
Hold for 5 breaths, slowly lower, and repeat. Or, you can try inhaling as you lift, and exhaling as you lower, and repeat 5-10 times. See what feels best for your body today and honour it.
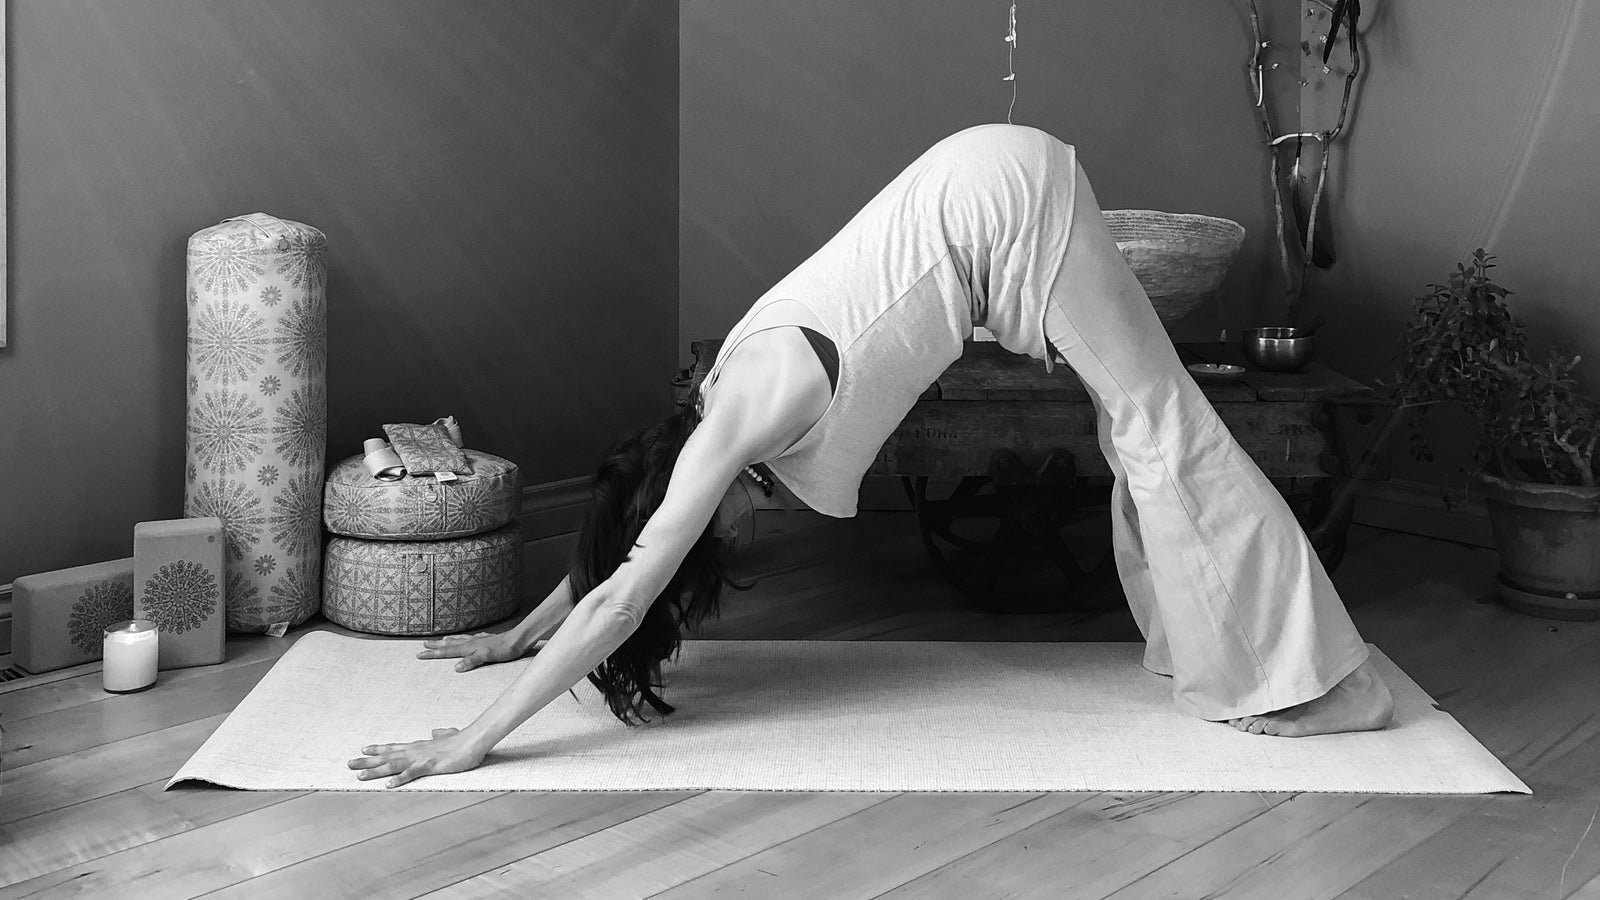

This quintessential yoga pose is a gentle inversion, so you get great lymph movement, and decompression of the spine. It opens your chest and shoulders, strengthens your arms, stretches your hamstrings, calves and achilles tendons, and builds body awareness.
If you have wrist pain, consider engaging your hands more and pressing through your knuckles, or placing a folded towel under your wrists so your knuckles are still on the mat and taking most of the weight. You can also come down onto forearms, or hold on to cork blocks with your thumbs facing inward, which will help build the forearm and hand strength. As always, practice in your comfortable range and you might want to avoid this pose altogether if you have an acute shoulder injury.
HOW TO DO DOWNWARD FACING DOG:
Begin on hands and knees; shoulders over wrists, hips over knees.
Align your index fingers parallel and pointing straight forward, fingers spread evenly.
Press down through your knuckles and fingertips, rooting into the floor (make sure to keep from placing too much pressure in the base of your palms to protect your wrists.)
Walk your knees back a few inches, toes curled under.
Keep your arms strong and straight, and your shoulders away from your ears.
Start to lift your hips first backwards away from your hands, and only then move them upwards the sky, creating a long straight line through your spine, from crown to tailbone.
Work to keep your lower ribs tucked into your body, and breathe into your back and sides.
Start to press your legs straighter, rooting your heels down towards the floor. But please know that you do not have to get your heels to the floor, it's not necessary.
If you find your lower back is rounding, step your feet back a little further, or keep your knees bent. Prioritize the length of your spine.
Feel free to allow some movement; peddle your feet, shift from side to side, experiment with shoulder positions -- find your pose from the inside out.
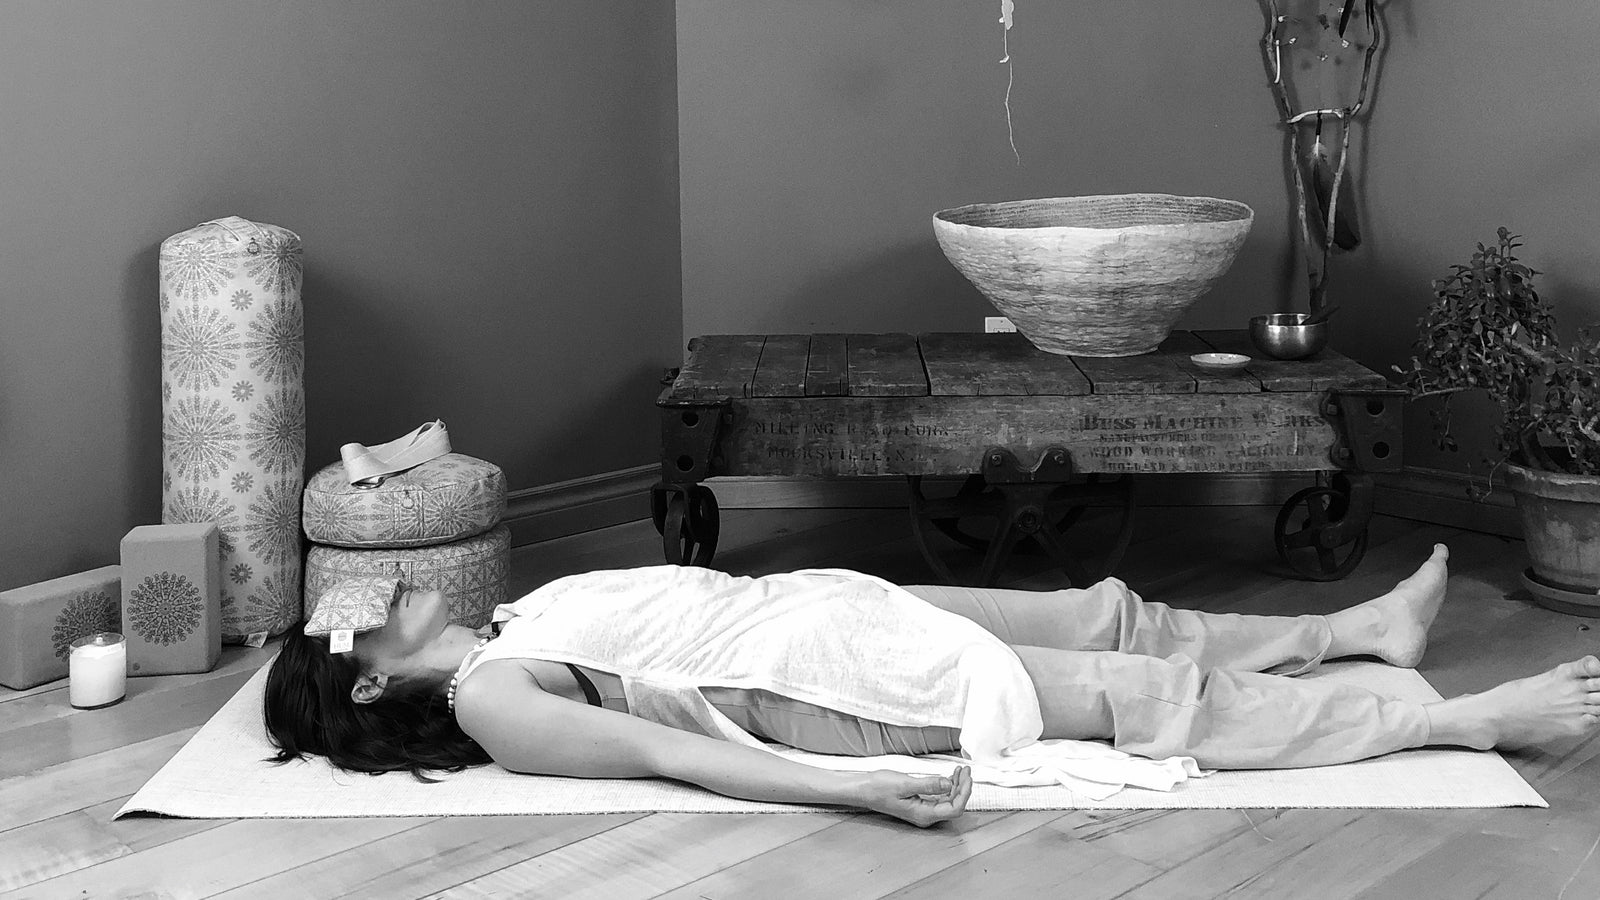

Every practice should end with this final resting pose, usually referred to by it's Sanskrit name, "savasana" (pronounced sha-VA-sana). Savasana is a meditative pose, with the whole body relaxed on the floor as you focus on the movement of your natural breath, the flow of oxygen in and out of your body. This pose allows you to fully release and let go, and consolidates all the work done during your practice. It is a vital pose for every practice. A practice without savasana is like mixing up a batch of cookies using the most delicious, high quality ingredients, but forgetting to bake them. Savasana is like baking in (consolidating) the benefits of your practice.
Sometimes, savasana is the only pose you need. It can be a practice in and of itself.
HOW TO DO SAVASANA:
Lie down on your back with your legs extended, your feet slightly apart and allowed to flop to the sides.
Your arms are extended at a comfortable distance from your sides with palms turned up.
Your eyes remain closed throughout this pose.
Begin to relax your body and release all tension into the floor. Focus on relaxing and releasing, all parts of your body.
Breath naturally, taking long and even breaths.
Stay alert and present by focusing on your breath as it flows in and out. Thoughts may come into your mind, just gently let them go and come back to your breath.
Work with props to support your body and increase you relaxation. A bolster is can add comfort under your knees, a folded shawl will support your head. An eye pillow is a wonderful addition to your practice, shielding your eyes from visual stimulation, and the gentle weight helps to calm your mind.


I am joyful and grateful to work with Jennifer Reaburn, inspiring yoga and mindfulness teacher, to create this content for HUM. If ever there was a person authentically living yoga every day, it's Jennifer. With kindness, compassion and creativity, she weaves a tapestry of mindfulness, poetry, gratitude, connection to the earth, the power of intention, reverence for the ancient teachings, and limitless curiosity into her yoga practice and her teachings. Her yoga journey began in 2000, when a health scare led her to investigate mind-body connections and to the realization that she had been living with trauma and a sense of disconnection from her body. She dove into healing that disconnection, and headed off to India for a life-changing year of solo travel, learning and yoga. Yoga became a big part of her life, and she practiced for 10 years before being called to teach. Now, trained in various styles of yoga, in evidence-based movement science, trauma-informed care, philosophy, breath work, and mindfulness meditation, she has a broad and varied palette to paint with when she teaches, and no class is ever the same. Each one is open-hearted, fun, both challenging and accessible, inviting presence through body and breath. She is also part of an important county-wide mission to support the wellness of children and youth by bringing mindfulness and yoga into schools. Her ultimate goal as a teacher is to empower people with the tools to notice and choose what is right for them moment by moment, both on the mat and off.
@jenreaburnyoga
jenreaburn.yoga
Jennifer Reaburn Yoga